

To achieve the effect you´ll use:
- Selective Color,
- Color Balance,
- Levels.
Attention, please!
 If you tweet this article you may win amazing fog brushes! Look on the bottom of the article to discover more!
Where was the photo taken?
I took this photo during one of the first nice spring mornings. It was still bit cold but you could feel from everywhere that nature was coming back to life. First flowers started blooming, birds finally sang again and everything looked nicer and more optimistic.Me and my sister woke up early that day because we needed to arrange some stuff in town and what was supposed to be boring visit of grocery quickly changed into a beautiful walk. We spontaneously took few outfit photos and I also shot the photo above.

But enough rambling and let´s focus on post processing, right? :)
Resource photo
You can download the photo below and try the steps on it. If you decide to upload finished piece somewhere please include link on this article so more people can follow my blog.Thank you!

Post Processing
As I said post processing is quick and easy but sometimes you just don´t have enough time or just don´t want to make it complicated, right?1. Colder tones with Selective Color and Color Balance
First let´s add new adjustment layer Selective Color and set it as shown on the picture below.

Add new adjustment layer Color Balance and set it as on the following picture again.

After these two very easy adjustments you should have your photography similar to this one. As you can see it already has stronger atmosphere.

2. Adding depth by vignetting
If you add vignette it would look like there is more depth in the picture. The "mechanism" is that darker objects usually appear that they´re closer to us and lighter are more in distance.
Add new adjustment layer Levels and set the Input Levels on 0; 0,41; 255. Grab the Gradient Tool (G) and fill the layer mask with black color.
Then grab the Brush Tool (B), select some soft round brush and lower its Opacity on about 20%. Pick white color, make sure that the layer mask is active (just click on the thumbnail of it) and paint arround the edges of the picture.
Below you can see how the photo looks after this step.

3. More mist
I wanted to add more magical atmosphere to this photo. That´s why I added bit more mist. To do that download some mist brushes (I used these) and install them into Photoshop.

Select one of the brushes you´ve just installed. If necessary lower the Opacity of the brush (wth mine brushes you can work on 100%). Press Alt on your keyboard to activate the Eyedropper Tool (I) and select some very light color from the picture.
Paint some gentle mist. You can get inspiration where to paint below.

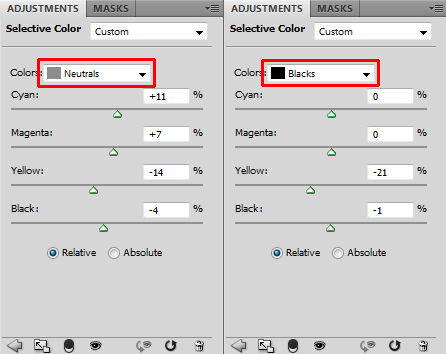
4. Colder tones again
With this photo I wanted to have really cold color palette. It was still more winter than spring and I wanted to have that feeling in the photo.
First, even if it may sound little weird given the first paragraph, add new adjustmen layer Color Balance and set it as shown below.

Now add new adjustment layer Selective Color and set it as below again.
And that´s it :)
Final Result
Below you can see how the final photo looks like.
Tweet and win!
First five people who tweet about this article win the amazing mist brushes used in this article! And then three more random people! So don´t hesitate and tweet! :)