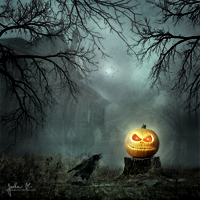
 In this tutorial you will learn different types of color adjustments, how to change lights and shadows, use custom brushes, warping objects and create strong focal point. Let’s get started!
Final Result
Let´s take a look at what you´ll be creating in this tutorial.
 |
| Final Result |
Below there is video showing layer by layer how the photomanipulation is done.
What have Halloween photo manipulations usually in common? Let’s take a look at following list:
1. spooky atmosphere
2. night settings
3. witches or witchcraft
4. carving jack-o’-lanterns
You may keep it in mind during creating your own picture.
Tutorial
Step 1 – Preparing the Background
This step will be quite quick. Download the picture of the background and open it in Photoshop. To decrease saturation of the picture add a new adjustment layer Hue/Saturation. You can find the button Create new fill or adjustment layer in the bottom part of the Layers Palette. (If you don´t see this palette go to Window > Palette or press F7 on your keyboard.)
In all my tutorials I always recommend to use adjustment layers instead of direct adjustments which can be found in Image > Adjustments… With adjustments layers you can change the adjustment whenever you want but with direct adjustments only as many steps back as you have set your History. Back to the tutorial. As I already said add new adjustment layer Hue/Saturation and set the value Saturation on -20.
Because you want the adjustment layer to adjusts only one layer bellow (which means BACKGROUND) right click on the adjustment and select the option Create Clipping Mask.
After this step your image should look like the one below.
Step 2 – Adding the House
As you may see the left part of the image is quite empty and it looks uninteresting. To make it better looking you should add something there. And since this is Halloween photo manipulation what could be better than some old scary house? Open the picture of the house and cut out the background. Drag it into your photomanipulation. Name this new layer HOUSE and put it on the top of the layers. Press Ctrl + T on your keyboard and resize the house on proper size. Go to Edit > Transform > Flip Horizontal to flip the layer.
Step 3 – Blending the House
Right now the house doesn’t look like it belongs to the scene. If you compare it with the tree on the right the house is too dark and has very high contrast. It should be lower because of all the mist which is in the scene. Before you start with adjusting let’s blend bottom part of the house little better. Add new layer mask to the HOUSE. You can find the button Add new layer mask on the bottom part of the Layers palette left to the button Create new fill or adjustment layer you’ve used in previous step.
Using layer mask instead of the Eraser tool has the same advantages as using adjustment layers. Layer mask hide parts of the image you want but doesn’t erase them as the Eraser Tool so you can let them appear any time you want.
Make sure that the layer mask is active – just click on it. Grab the Brush Tool (B), select soft round brush and set the Opacity on 80%. Pick black color and paint over the bottom part of the house which you want to disappear. Your image should look like the one below so far.
To make the house look like it’s in the mist in distance lower the Opacity of the layer HOUSE on 50%. Another thing you need to do is to lower the contrast of the building. Add new adjustment layer Brightness/Contrast above the HOUSE and set the value Contrast on -80.
Right click on the adjustment layer Brightness/Contrast and create a clipping mask from it. After this step your image should look like the following picture.


