

In this tutorial you will learn how to naturaly sharp the image, adjust separately contrast in lights and shadows thanks to Luminosity selection and correct colors with Selective Color.
Let´s get started!
There are three important parts in this tutorial:
- sharpening,
- adjusting contrast with luminosity selection,
- enhancing colors with Selective Color.
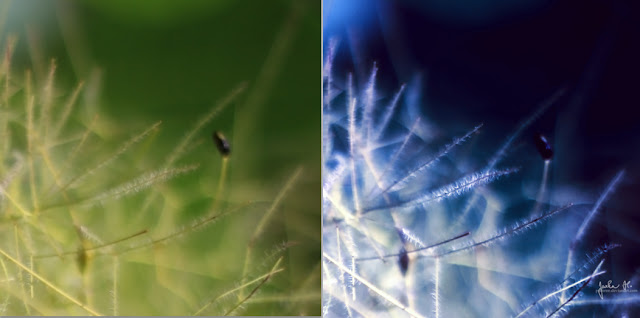 |
| Before and After |
You can download the picture below to complete this tutorial. It´s just for learning purposes of this tutorial so please don´t upload the final result anywhere. Thank youfor your understanding!
 |
| Please use it for this tutorial only |
1. Sharpening
For sharpening the picture you will use High Pass filter. I wrote more about this way of sharpening in the article "3 Favorite Tools in Photoshop". It´s my favorite way to sharp image because it makes really natural look without hallo effects.
To sharpen the image right click on the Background layer and select the option Duplicate layer. Now go to Filter > Other > High Pass and set the value Radius to be able to see decent edges of the flower.
Bellow you can see how it should look.
 |
| Layer with High Pass filter |

2. Enhancing Contrast With Luminosity Selection
Before you start increasing contrast separately in lights and shadows let´s increase contrast of the whole picture. To do that add new adjustment layer Gradient Map on the top of all layers. Select Black, White gradient and change Blending Mode of this layer on Luminosity.
Below you can see how the photo looks so far.
 |
| Contrast increased with Gradient Map |
Luminosity selection is a great way how to quickly select only lights or shadows in the picture. I used this same technique during editing backlight portrait, you can read about it in the article "Backlight Portraits: Edit Them Easily" to see more possible uses.
To activate the luminosity selection click on the Background layer and press Alt + Ctrl + 2 (it may be different in older versions of Photoshop). The shortcut masks the lights of the photo.
With the mask activated add new adjustment layer Levels and set it as on the following picture.
 |
| Levels for highlights |
With the active selection add new adjustment layer Levels on the top of all layers and set it as on the picture below.
 |
| Levels for shadows |

3. Adjusting Colors
I really love to adjust colors with Selective Color adjusment. You can make really big changes with only this one tool. If you want to know more about this tool you can take a look at the article "Magic of Luminosity Blending Mode".
Add new adjustment layer Selective Color on the top of all layers and set it same way as on the following picture.
 |
| Setting of Selective Color adjustment |
After this adjustment the contrast is little lower than it should be. To increase it add new adjustment layer Levels on the top of all layers and set the Input Levels on 25; 1,00; 232.
You should have picture like the one below.
 |
| Final result |
More Macro Shots
Below you can see some more examples of my macro shots. Do you want to know how I edited some of them? Let me know in the comments and I may write about it in some of the future articles!


New Article
Are you courious what will be new article about? Don´t want to miss any new content? Subscribe via RSS!
In next week article I will speak about creating magical light in your manipulations and photos. Bellow you can see what you´ll be creating.

Conclusion
As you may see it´s quite easy to adjust the macro photo and to give it really nice cotrast and colors. You actually used only two adjustments - Levels and Selective Color!
I really hope that the article was useful for you. Will you use it on some of your photos? Or will you try to complete this tutorial? I´d like to see your answer in comments below!
Have a great day
- Jarka