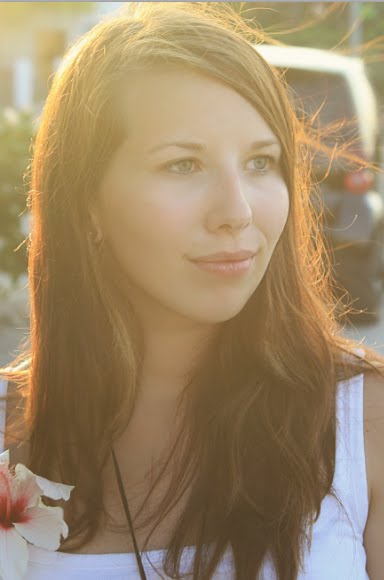
Bellow you can see the original photo which we will be editing and the finished result.
Original Picture
Bellow you can download the source photo to can follow the tutorial.
Step 1 - Sharpening
I usually sharpen every photo a little bit. It gives the photo more professional look. I can recomment you to use the High Pass Filter instead of usual sharpening methods because this way you get less halo effect then with other methods. (You can read article about High Pass here)
Right click on the background layer and select Duplicate Layer. Click on the new layer and name it SHARPENING. Now go to Filter > Other > High Pass... and set the value Radius so you can see gently borders of the image.
Change the Blending Mode of this layer on Overlay.
Step 2 - Softening
Now it´s time to soft the skin a little. Duplicate the backgroud layer once again and place this new layer on the top of the layers. Name it SOFTENING.
Go to Filter > Other > High Pass and set the Radius so you can see the borders as it´s shown on the picture above as a wrong way.
Press OK and change the Blending Mode of the layer on Overlay. Press Ctrl + I to invert colors of the layer.
Add layer mask to this layer. You can find the button Add vector mask on the bottom part of the palette Layers. (If you don´t see this palette just click F9).
Make sure that the vector mask is active - just click on it.
Grab the Gradient Tool (G), pick the black color and fill the layer mask of this layer with the solid black color.
Grab the Brush Tool (B), pick white color and paint over the parts of the face which you want to soften.
After this step you should get something like this.
Step 3 - Warmer Tones
The tones of the portrait are too blueish. To fix that create a new layer on the top of all layers. Grab the Gradient Tool (G), pick #c79354 orange color and fill the layer with it.
Change the Blending Mode of this layer on Soft Light and lower the Fill on 25%.
To make the effect even more visible add new layer on the top of the layers and this time fill it with #e9d68b yellow. Change the Blending Mode on Screen. Lower the Opacity on 20% and Fill on 70%.
Step 4 - Global Lightening
The portrait would look better if it is lighter. To do that add new adjustment layer Levels on the top of the layers and set the Input Values as it´s seen bellow.
Step 5 - Adjusting the Highlights
In this step we will focus on highlights of the picture. To do that we will need to make selection based on the Luminosity of the tones. To do that click on the background picture and press Alt + Ctrl + 2 (the shortcut is bit different in CS3 and lower).
With the layer active add new adjustment Curves and set it as it´s shown bellow. Then place this layer on the top of all layers.
Step 6 - Adjusting Shadows
Go back on the background picture and make the Luminosity selection again. Go to Selection > Invert to invert the mask so you can adjust shadows instead of highlights.
Add adjustment layer Curves again and set it as you can see bellow.
Place the layer on the top of all layers.
The picture should look like the one bellow.
Step 7 - Adding Contrast
The picture would look better with higher contrast. To do that add new adjustment layer Gradient Map on the top of the layers. Select classic Black, White gradient and change the Blending Mode of the layer on Luminosity.
Step 8 - Darkening the Midtones
The photo would look better if it has darker midtones. To do that add new adjustment layer Levels and set the Input Levels on 0; 0,69; 255
Final Preview
You´re finished! Hope this article was useful for you. Bellow you can see the final picture and also examples of my backlight portraits.
Examples of Backlight Portraits


